Have you ever felt overwhelmed by all the different types of milling operations? Have you struggled to tell the difference between face milling and peripheral milling? Do you know when to choose slot milling over plunge milling? Have you heard of contour or trochoidal milling but don’t know what they’re for? Which milling operation is best for surface finish, and which one for fast material removal?
There are 15 widely used milling operations in machining. These include face milling to flatten surfaces, peripheral milling to cut edges, slot and plunge milling for grooves and cavities, contour and profile milling for shaping complex forms, angular and form milling for angled features, end milling for bottoms and walls, straddle milling for dual-side cutting, thread and gear milling to form threads and teeth, and trochoidal and gang milling to enhance speed and chip flow. Each operation plays a distinct role in precision, finish, and geometric control.
Continue reading to explore 15 milling operations, their working principles, ideal use cases, tool types, and machining advantages to help you select the right process for every task.
What Are Milling Operations?
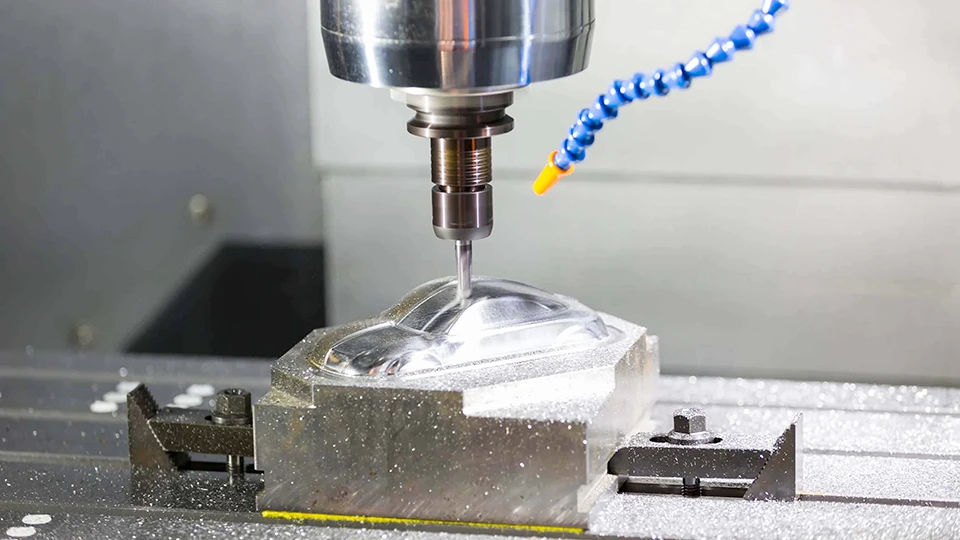
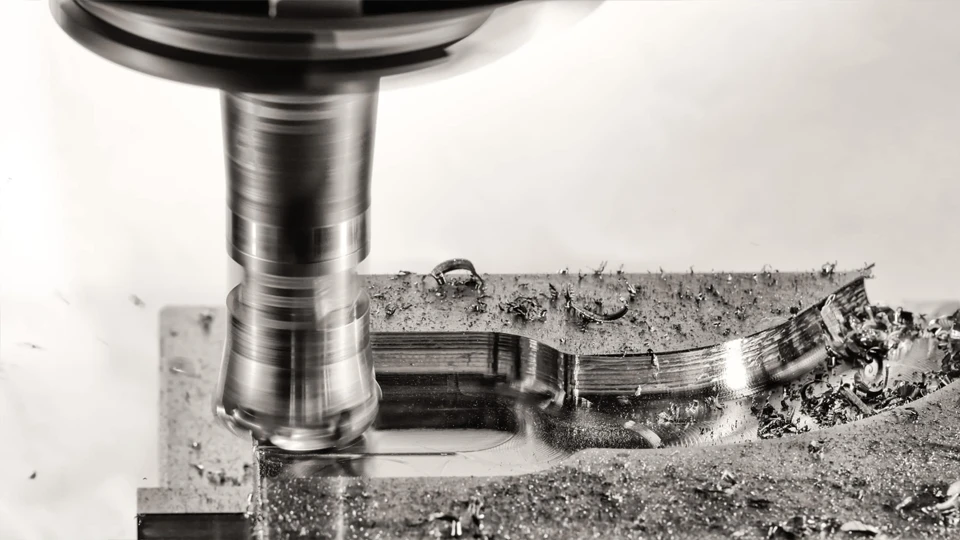
Milling operations are precision machining techniques that use a rotating multi-point cutting tool to remove material from a stationary or moving workpiece. By advancing the cutter into the material along one or more axes, it can generate a wide range of shapes—from flat surfaces to intricate 3D contours. This is the foundation of nearly every milling process, whether manual or CNC-controlled.
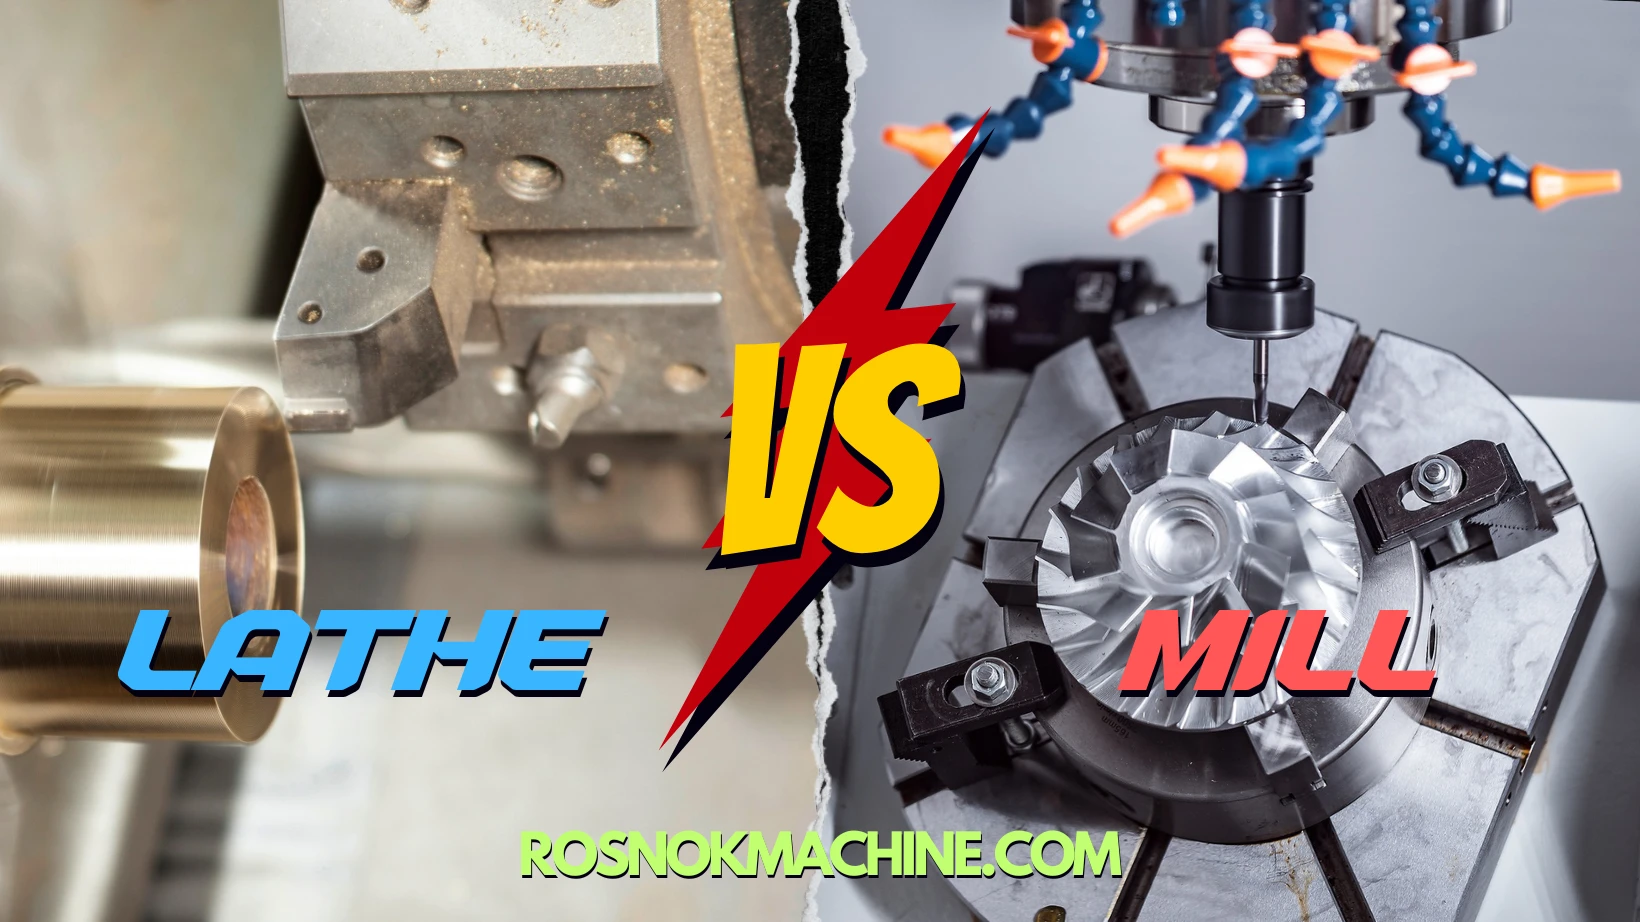
In contrast to turning, which typically uses a single-point tool and rotates the workpiece, milling rotates the cutting tool and offers greater versatility. It’s used for machining metals, plastics, composites, and more—making it one of the most common and essential types of machining operations in manufacturing.
The key goal of any milling operation is to create accurate geometries with high-quality surface finishes. Whether roughing or finishing, different types of milling operations serve specific roles: some remove bulk material quickly, others achieve fine tolerances or complex curves. This process is widely adopted in automotive, aerospace, medical, and mold-making industries due to its adaptability and precision.
Knowing the types of milling and their functions helps manufacturers choose the right operation for each job—maximizing tool life, improving efficiency, and minimizing errors. From simple face milling to high-speed trochoidal paths, mastering these operations is the first step toward optimized CNC performance.
Why Understanding Milling Types Matters
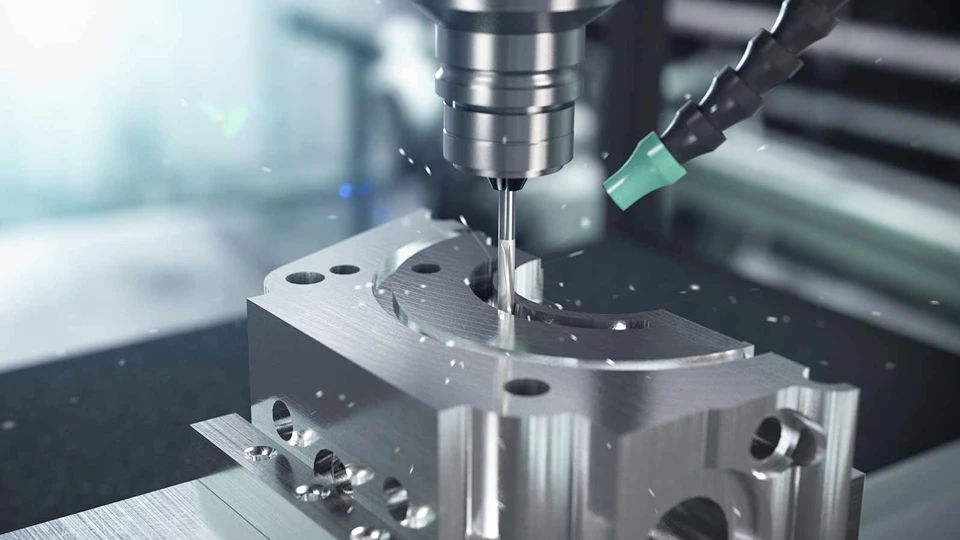
Choosing the right milling operation isn’t just about knowing what’s available. It directly affects the final part’s surface finish, dimensional accuracy, and production cost. When manufacturers don’t match the milling type to the material or geometry, it often leads to poor tool life, excessive vibration, or inconsistent results.
Each of the different types of milling operations is designed for specific tasks. For example, face milling is excellent for flat surface finishing, while plunge milling is better suited for roughing deep cavities with less side pressure. If a wrong method is chosen, you may see tool chipping, thermal deformation, or excessive wear—outcomes that could be avoided with better process planning.
Understanding the different types of milling and their strengths helps engineers and technicians make smarter decisions. It allows them to balance speed, precision, and tool longevity based on part complexity and production volume. Whether you’re choosing between types of CNC milling operations or evaluating different types of milling process for a specific alloy, being able to distinguish and apply the right technique is key to quality and efficiency.
15 Types of Milling Operations Explained
With so many possible milling strategies, it’s easy to get lost in trial and error—especially when the differences between operations seem subtle. That’s why a structured understanding of all major milling types is essential. Instead of improvising, machinists can rely on proven methods tailored to specific shapes, material conditions, and cutting goals.
In the sections that follow, we’ll walk through 15 distinct types of milling operations. This breakdown will help clarify which process to use when, and give you a solid foundation to optimize tool life, surface quality, and machining efficiency.
1. Face Milling
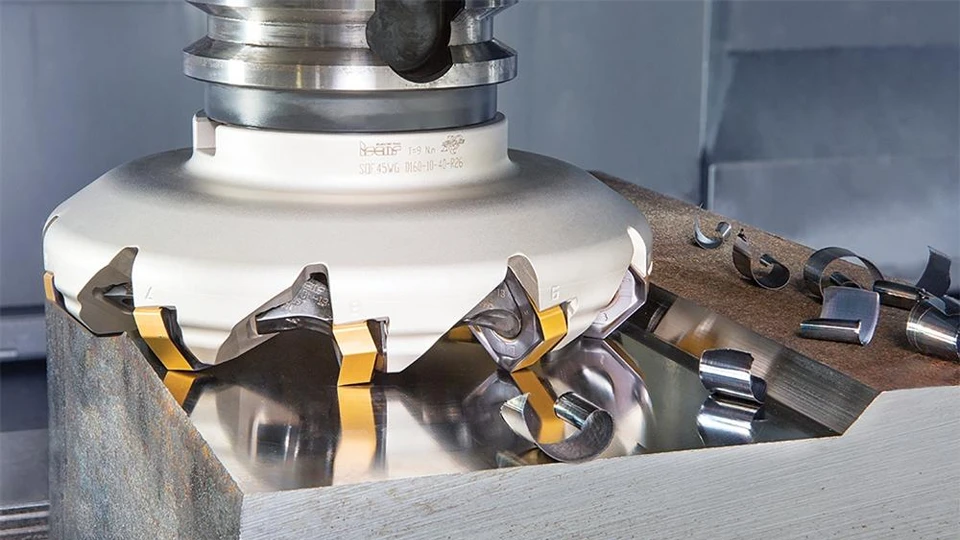
Face milling is a fundamental and widely used type of milling operation. It involves a rotating cutting tool that moves perpendicular to the surface of the workpiece, sweeping across a broad area to remove material and create a flat surface. This method is commonly applied in the initial stages of machining large workpieces, such as metal plates or cast parts, to produce clean, smooth surfaces with minimal variation in height.
By distributing the cutting action across the entire tool face, face milling ensures stable contact and consistent material removal. Its simplicity and reliability make it a go-to choice for surface refinement in both manual and CNC milling setups, and it plays a key role in improving surface flatness for subsequent precision steps.
Best Surface Finishing Use Cases
Face milling is often used when a high-quality surface finish is needed over a large area. It is ideal for preparing the top surface of mold bases, fixtures, and die components. This operation is especially effective on materials like cast iron, aluminum, and low-carbon steel, where smooth finishes and tight flatness tolerances are essential for assembly or downstream machining.
Recommended Tools and Cutting Parameters
Use indexable face mills with carbide inserts to balance performance and cost. Larger cutter diameters allow wider passes and reduce machining time. For optimal results, select tools with a high rake angle and adjust spindle speeds and feed rates to avoid chatter or tool wear. Coolant flow should be sufficient to maintain surface integrity.
Face Milling vs End Milling
While both methods can create flat surfaces, face milling cuts with the face of the tool across a large area, whereas end milling typically uses the tool’s sides for pocketing and contouring. Face milling is better for bulk top-surface removal, while end milling is suited for finer features or complex paths. Choosing the wrong one can affect both efficiency and surface quality.
2. Peripheral Milling
Peripheral milling, also known as plain milling, is a machining technique where the cutting edges of the tool engage with the workpiece along its circumference. The cutter rotates parallel to the machined surface, producing a shearing action that removes material from the side of the workpiece. This operation is commonly used in CNC milling and is distinct from face milling, which targets the top surface. Peripheral milling supports long, continuous cuts and is ideal for achieving consistent depths and profiles along a linear path, especially in side-oriented machining strategies.
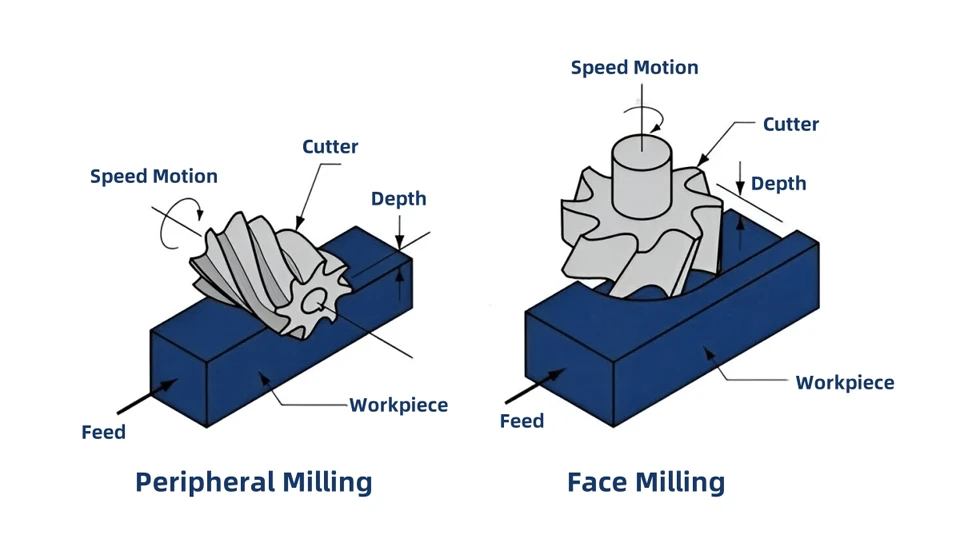
Application in Edge and Side Wall Machining
Peripheral milling is widely applied in trimming the external edges of a component and refining vertical side walls. This makes it essential for part finishing in mold frames, structural housings, and die blocks where edge precision is critical. Materials like aluminum, carbon steel, and hardened tool steels are frequently processed using this method. When choosing among different types of milling operations, peripheral milling stands out for its ability to deliver clean edges with minimal burrs and tight dimensional accuracy across the length of the machined profile.
Feed Direction, Tool Geometry, and Setup Tips
Successful peripheral milling relies on selecting the right feed direction and tool shape. Conventional milling, where the cutter rotates against the feed direction, offers better surface control for harder materials, while climb milling provides smoother finishes and longer tool life under stable setups. Tool geometry matters too—using end mills with appropriate helix angles and flute counts can improve chip evacuation and reduce vibration. Proper fixturing is crucial: the workpiece must be clamped rigidly to avoid deflection during lateral cutting, especially when dealing with deep or extended cuts along the edges.
3. Slot Milling
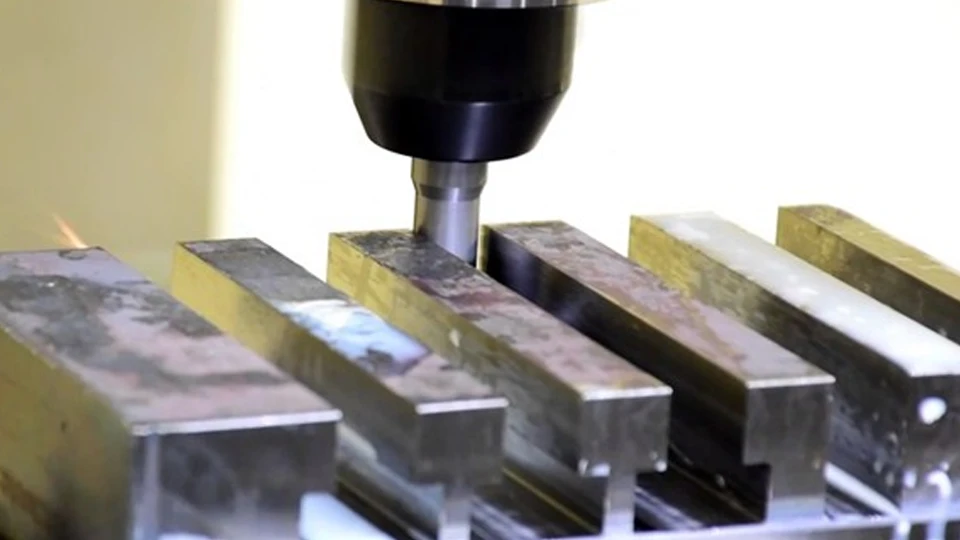
Slot milling is a common technique used to create straight, narrow channels in a workpiece. These channels—commonly referred to as slots—are typically cut into the top surface of the part. The process involves feeding a rotating end mill, usually perpendicular to the surface, to remove material and form the slot’s desired width and depth. It’s especially effective when precision alignment is required between mating components. Unlike face or peripheral milling, slot milling is designed to fully engage the cutter along its entire diameter, making chip evacuation and tool deflection critical considerations.
Ideal for Keyways, T-Slots, and Grooves
Slot milling is essential for manufacturing features like keyways for shaft-hub connections, T-slots on machine tables, and decorative or functional grooves in structural parts. Keyways must fit tightly with the key to ensure torque transmission without slippage, while T-slots require undercut shapes that secure jigs or workholding elements. This milling operation offers high dimensional accuracy and repeatability, especially in CNC machining where precision slot depths and uniformity are vital across multiple parts.
Tool Selection for Narrow vs Wide Slots
For narrow slots, two- or three-flute end mills are preferred due to their reduced core diameter and better chip clearance. These tools minimize tool deflection and heat build-up. For wider slots, multi-pass milling using a larger diameter tool or multiple passes with side stepover is more efficient. In CNC applications, indexable slot cutters or T-slot cutters may be selected depending on the groove shape. Always consider cutter diameter, flute count, and coating when selecting tools for different types of milling operations, especially to maintain edge finish and slot dimensional stability.
4. Plunge Milling
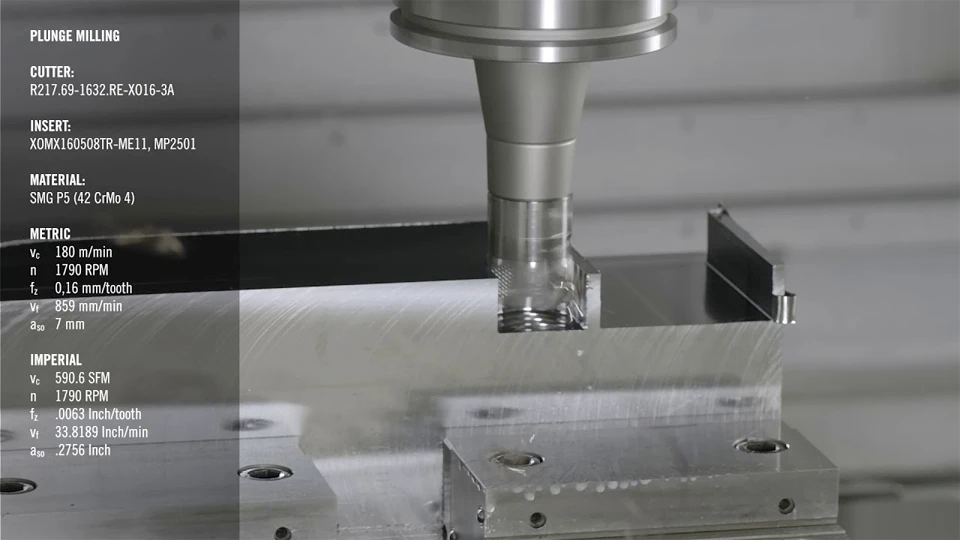
Plunge milling is a vertical cutting strategy where the tool feeds directly into the material along the Z-axis, rather than slicing across the surface. This type of milling operation is especially useful when machining deep cavities, pockets, or features with high aspect ratios. It significantly reduces lateral cutting forces compared to side milling, making it ideal for situations where tool deflection or chatter is a concern. Plunge milling is commonly applied in roughing stages of mold-making and aerospace components.
Effective Roughing of Deep Cavities
Plunge milling excels in roughing deep pockets where traditional strategies may lead to tool instability or excessive vibration. Because the tool enters material vertically, it avoids side forces that could compromise dimensional accuracy. This makes it particularly effective in high-strength alloys or hardened steels, where maintaining rigidity is critical during deep cuts. It’s often used when side milling would over-stress the tool or the machine structure.
Benefits in Tool Life and Rigidity
One of the key advantages of plunge milling lies in tool life extension. Since cutting is done primarily in compression rather than shear, tool wear is more uniform and predictable. Additionally, the vertical engagement improves spindle load distribution, leading to better machine rigidity and reduced tool breakage. When combined with high-feed indexable cutters, plunge milling can become a very cost-effective method in both small-batch and heavy-duty CNC applications.
💡 Heads Up! 3 Signs You Might Be Using the Wrong Milling Strategy
-
❶ Surface Finish Looks Like a Bad Haircut?
If your surface is full of chatter marks, burrs, or just doesn’t feel smooth—your milling method might be to blame. Using the wrong technique (like edge milling for a wide flat part) causes ugly finishes. -
❷ Tools Dying Faster Than Your Coffee Gets Cold?
When inserts wear out too fast, it’s often a feed rate or tool mismatch problem. Sometimes, you’re just forcing the wrong type of milling into a job it wasn’t born to do. -
❸ Parts Shaking Like Jelly?
If your workpiece vibrates or comes out slightly misshaped, the strategy might be too aggressive or unsupported. Plunge milling beats profile milling when it comes to deep, stable cuts.
✔️ If any of these hit home, don’t panic—just tweak your approach! Choosing the right type of milling operation keeps things sharp, smooth, and stress-free (for both you and your machine).
5. Contour Milling
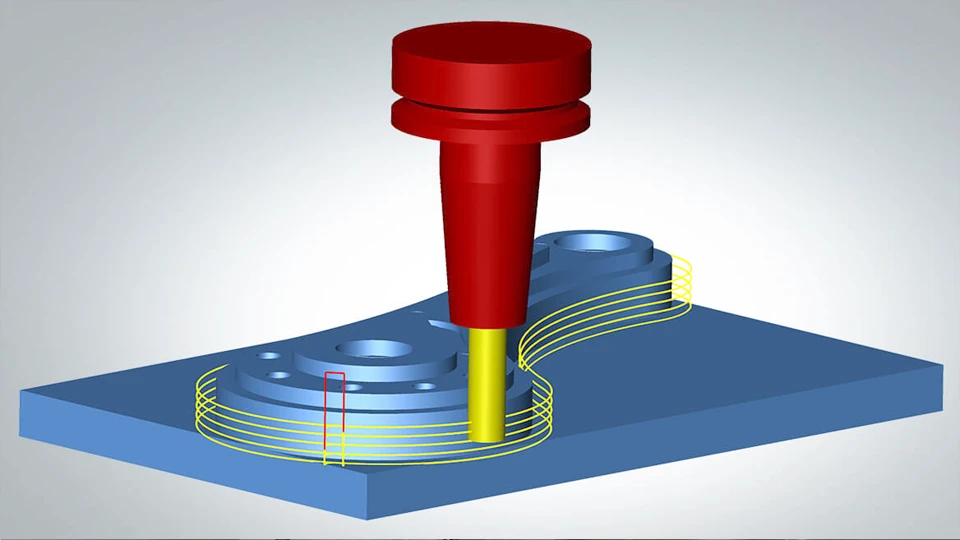
Contour milling is a method used to follow irregular or curved geometries on a workpiece, particularly when surfaces vary in height or shape. Instead of a linear path, it allows the cutter to move dynamically along three-dimensional curves, maintaining precise engagement with the surface. This type of milling is common in mold and die production, aerospace parts, and components with complex cavities. The process requires reliable CAM software and high-speed CNC systems capable of executing precise 3D toolpaths without losing tolerance across changing contours.
Used in Mold and Die Making
Contour milling excels in tool and die applications where form accuracy and surface consistency are key. Whether shaping turbine blades or plastic injection molds, it adapts to changing depths and curved walls with high precision.
3D Toolpath for Irregular Surfaces
This operation uses Z-level machining and adaptive toolpaths that follow the 3D shape of the part. These techniques reduce scallop marks and allow for more consistent engagement, especially in complex geometries with varying slope angles.
Contour vs Peripheral Milling: What’s the Difference?
While both involve side cutting, peripheral milling is best suited for straight, flat sidewalls or external profiles. In contrast, contour milling is designed for 3D surfaces, following non-linear, non-flat paths. Peripheral milling works on uniform depth; contour milling adjusts depth and angle dynamically to match the part’s surface curvature.
6. Profile Milling
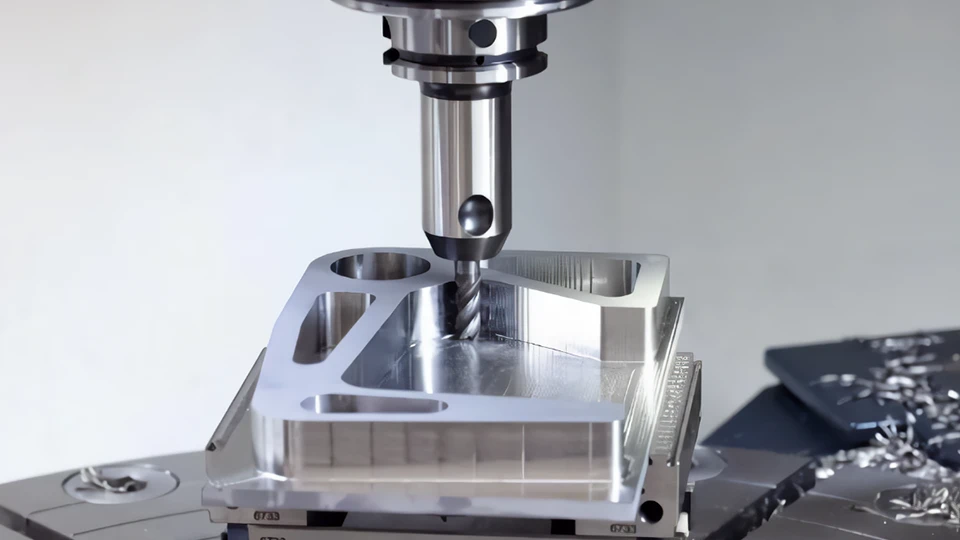
Profile milling is a method used to machine the outline or boundary of a part. It’s applied when a component requires precise edge shaping along curves or straight lines, without necessarily involving full surface flattening or cavity work. Unlike contour milling, which often follows complex 3D paths, profile milling typically maintains a consistent depth while following a defined perimeter. This process plays a critical role in shaping brackets, covers, mold components, and mechanical parts that rely on tight dimensional control.
Creating Complex Perimeters
Profile milling is ideal for generating open or closed perimeters with geometric complexity. It enables manufacturers to follow the outer boundary of a component, forming custom shapes like arcs, angles, and contours. This is especially valuable in aerospace or robotics applications, where structural pieces often feature intricate outlines that must fit precisely with mating components.
Suitable for 2.5D & 3D Machining
This operation fits both 2.5D and full 3D machining depending on toolpath strategy. In 2.5D milling, the cutter moves in X and Y directions while maintaining a fixed depth, ideal for flat contour outlines. In 3D operations, especially for shaped mold bases or sculpted frames, the Z-axis varies continuously to accommodate more complex geometry without repositioning the workpiece.
7. End Milling
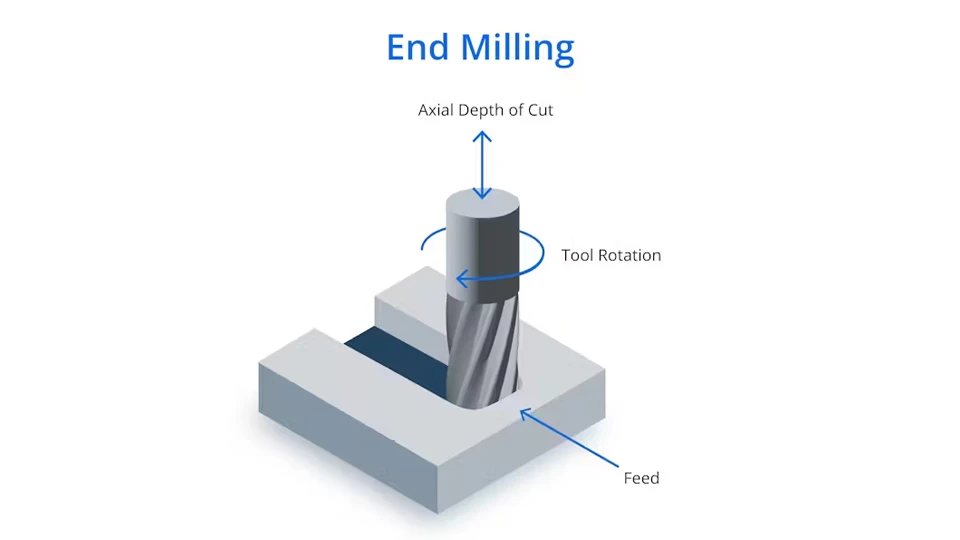
End milling uses the bottom and side edges of a rotating cutter to remove material. Unlike operations limited to surface shaping, this method supports both horizontal and vertical engagement. That makes it suitable for producing features like corners, steps, and internal walls with high dimensional accuracy. Its ability to cut flat and angled surfaces makes it one of the most flexible types of milling operations.
Bottom and Wall Cutting in Cavities
End mills are frequently used to machine the bottom floor and vertical walls of cavities. This makes them a primary choice in mold-making, die sinking, and fixture building where accuracy of depth and sharp internal corners are critical. Whether you’re cutting shallow slots or deep internal structures, end milling offers control over depth and side finish that other milling types may lack.
Straight Flute vs Ball Nose End Mills
Tool geometry matters. Straight flute end mills deliver a flat-bottom finish and are ideal for creating clean, sharp-edged cavities in rigid materials. Ball nose end mills, on the other hand, are better suited for curved surfaces, 3D contours, or gradual transitions in complex parts. The choice between them hinges on your part’s geometry and the type of milling process required—flat surface profiling or sculpted surface modeling.
8. Angular Milling
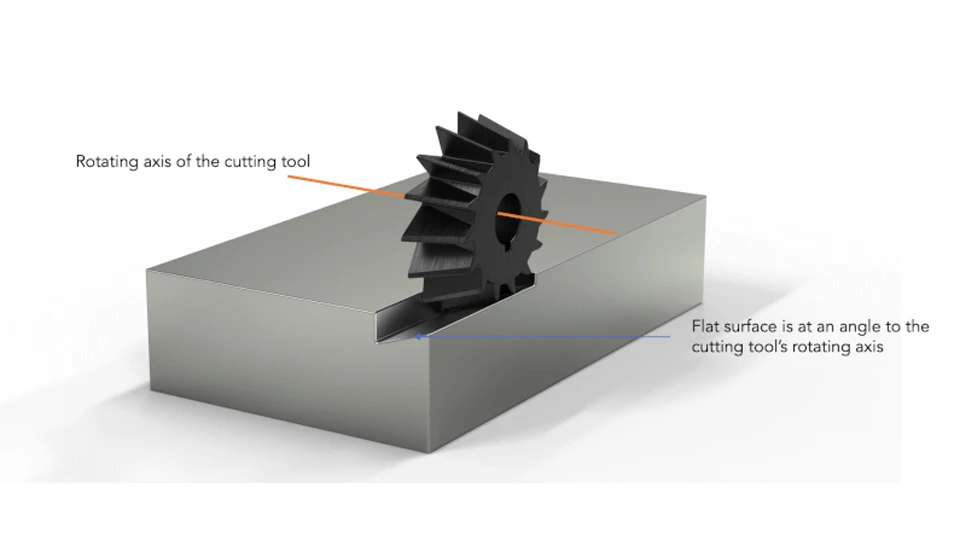
Angular milling is a machining method used to create features at specific angles to a workpiece surface. Unlike standard operations aligned with the primary machine axes, this process involves positioning the milling cutter at an angle—commonly using a specialized cutter like a single or double-angle tool. It’s often applied when parts require beveled or inclined surfaces as part of their design.
This operation relies on precise machine setup and angular alignment to achieve accurate cuts. Proper fixturing and angle definition are crucial to avoid dimensional errors, especially when dealing with compound geometries. Angular milling supports complex mechanical fits, flow transitions, and multi-surface joints without requiring secondary setups or manual finishing.
Cutting Chamfers, V-Grooves, and Inclined Planes
This method is widely used for creating chamfers to ease assembly or remove burrs, V-grooves for weld preparation, and inclined surfaces for structural or fluid dynamic purposes. Its ability to cut precisely angled geometries makes it indispensable in aerospace, mold tooling, and mechanical bracket production.
Compound Angle Setup Tips
To execute angular milling accurately, setups often involve sine bars, angle plates, or tilting vises. Ensuring the correct cutter angle—such as a dovetail or V-angle tool—is essential. Operators must also verify machine zeroing and alignment to prevent compound angle errors, which can lead to dimensional drift or tool failure.
9. Form Milling
Form milling is a specialized cutting technique where the tool’s shape directly matches the desired contour of the workpiece. Instead of relying on multiple toolpaths to shape complex profiles, the cutter itself carries the geometry, enabling direct imprinting during machining. This method is ideal when you need to reproduce curves, angles, or irregular outlines with consistency. It’s often used when the part demands complex profiles that would be difficult or inefficient to generate with standard milling tools.
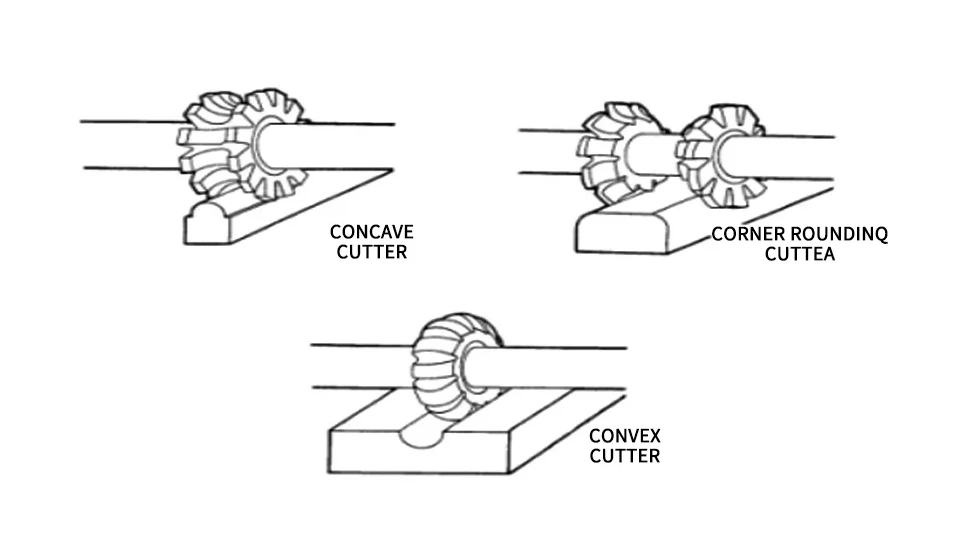
Machining Gears, Cams, and Complex Profiles
Form milling is commonly used to produce gear teeth, cam lobes, and other irregular profiles that require repeatable and precise forms. These parts often demand a high level of geometric accuracy, especially in automotive, mechanical timing, or power transmission systems. Since the cutter mirrors the final shape, form milling offers high efficiency in producing these intricate features with minimal toolpath programming.
Custom Tooling and Setup Considerations
Due to the nature of matched-profile tooling, form milling requires careful tool design and setup alignment. Custom cutters are often needed for each unique shape, which can increase lead time and cost. However, once prepared, the operation runs with excellent repeatability. It’s important to verify tool geometry against the CAD model and ensure rigid fixturing, especially when dealing with asymmetrical or non-standard contours.
10. Straddle Milling
Straddle milling is a unique type of milling operation where two side cutters are mounted on the same arbor, separated by spacers. This configuration enables the simultaneous machining of two parallel surfaces on opposite sides of a workpiece. It’s commonly used when the goal is to ensure perfect symmetry in slot width, groove depth, or sidewall positioning—especially for components like hex nuts, splined shafts, or structural brackets that require consistent spacing between features. The operation ensures both surfaces are cut in one pass, reducing cycle time and increasing dimensional accuracy.
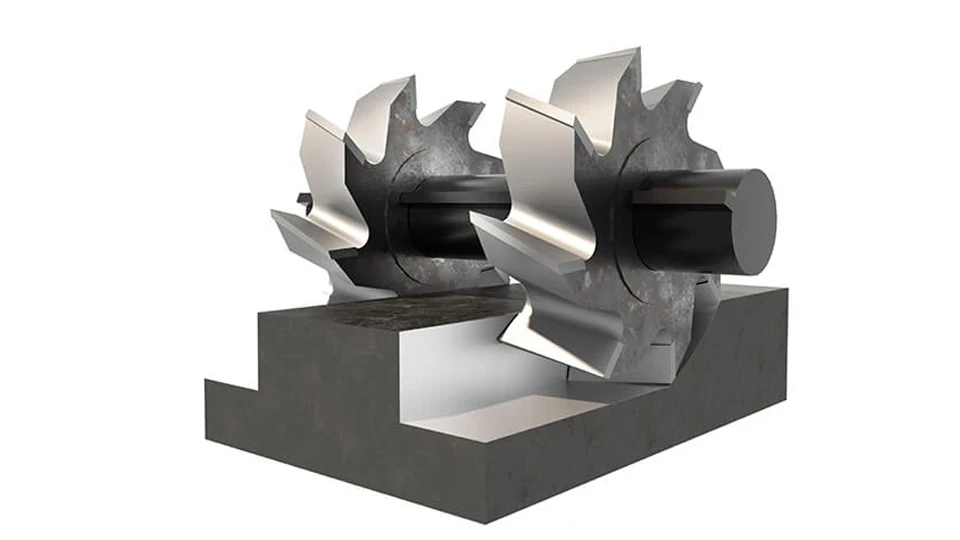
Dual-Cutter Symmetrical Machining
This milling method excels when paired surfaces must be perfectly aligned and equidistant. Straddle milling ensures that both sides are cut under identical conditions—same tool geometry, feed rate, and setup—making it ideal for parts where imbalance or asymmetric cuts would cause downstream assembly issues or failure. It’s a go-to method in automotive and heavy machinery applications, where dual-face precision is critical.
Centering and Part Alignment Techniques
Achieving accuracy in straddle milling depends heavily on part centering and alignment. The workpiece must be exactly centered between the cutters using shims, dial indicators, or digital readouts to ensure uniform material removal. Proper fixturing, rigid clamping, and pre-operation calibration are essential to avoid tolerance drift or parallelism errors. Using adjustable arbors or CNC-controlled axes can further enhance repeatability and efficiency.
❌ Common Mistake: A Lot of Beginners Use Slot Milling in the Wrong Places
-
① Confusing Slot Milling with Face Milling?
Slot milling is for grooves and slots—not wide flat faces. Using it like face milling often results in slow cuts and poor finishes. -
② Ignoring the Impact of Tool Width?
Narrow tools used on wide slots can deflect or vibrate. This reduces accuracy and may shorten tool life significantly. -
③ Overheating or Oversized Grooves?
Milling too fast or without the right coolant setup often leads to burned edges and dimensions that drift out of spec.
⚠️ Always use the right cutter for the job. Slot milling works best with tight tool-slot matches and slower, controlled feeds.
11. Thread Milling
Thread milling is a CNC machining method that creates threads using a helical toolpath instead of direct tapping. A rotating cutter enters the hole and gradually forms the thread profile by spiraling around the internal or external surface. This approach minimizes cutting pressure and offers greater flexibility, especially when producing threads of varying diameters or pitches. It’s ideal for high-precision thread cutting with excellent control over fit and finish, laying the groundwork for different thread strategies to follow.
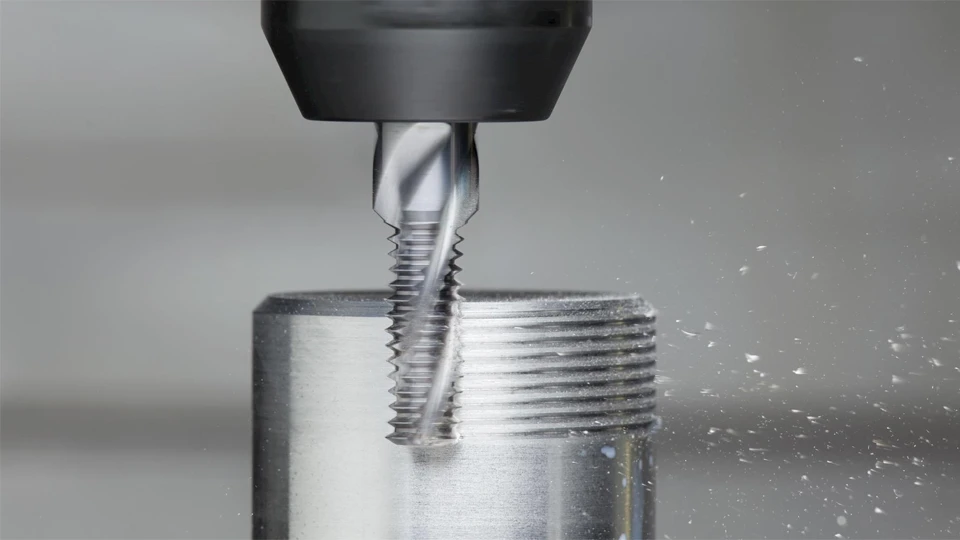
Internal and External Thread Strategies
Thread milling supports both internal and external threading, depending on the tool path and setup. For internal threads, the cutter enters a pre-drilled hole and spirals outward, following the desired pitch. For external threads, it follows a helical pattern around a shaft or boss. Using proper entry points, lead-ins, and back-off techniques ensures clean thread starts and consistent results. Thread milling is especially favored for CNC lathe and machining center setups that involve complex multi-axis movement or high-mix production runs.
Alternative to Tapping for Large Pitch or Hard Materials
When threading large holes, coarse pitches, or hard metals like titanium and Inconel, tapping becomes risky—tool breakage is common. Thread milling reduces this risk by using a lighter cutting load and incremental passes. Additionally, if a thread repair is needed, operators can simply re-run the toolpath without risking damage to the part. This flexibility makes thread milling a go-to choice for aerospace, oil & gas, and custom mechanical components where thread integrity is critical.
12. Gear Milling
Gear milling is a machining process used to create gear teeth by cutting along the profile of the gear using a milling cutter. This method offers an alternative when dedicated gear-making machines like hobbing machines are not available. It allows manufacturers to use a standard CNC milling machine to fabricate gears with various module sizes, pressure angles, and tooth shapes. While not ideal for mass production, it provides flexibility for producing gears in small batches or for prototyping.
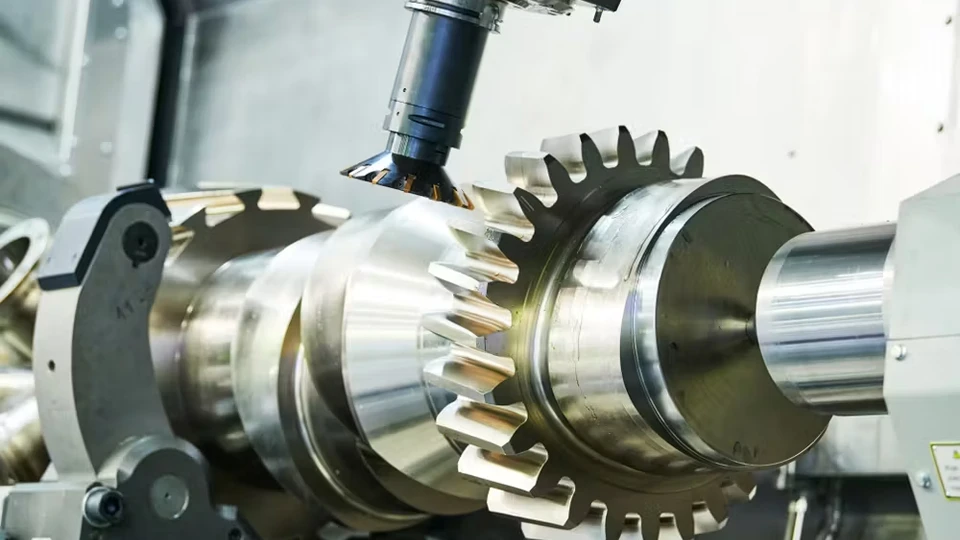
Low-Volume Custom Gear Fabrication
Gear milling shines in scenarios requiring low-volume or custom gear production. When producing one-off parts, prototypes, or repair components, this approach allows for rapid iteration without relying on dedicated gear-making machines. Complex gear geometries, such as internal gears or non-standard modules, can be milled accurately with the right toolpath strategy. Industries like aerospace, robotics, and equipment restoration frequently benefit from this flexibility, as they often require highly specific gear solutions with tight lead times.
Can Gear Milling Truly Replace Gear Hobbing Machines?
Despite its advantages, gear milling on a CNC machine doesn’t completely replace the capabilities of a dedicated gear hobbing machine. Hobbing still dominates in mass production, offering superior speed, tooth uniformity, and long-term precision. However, when production volume is low or non-standard profiles are needed, gear milling becomes a cost-effective and agile alternative. The decision depends on tolerance requirements, gear complexity, and whether the goal is short-run flexibility or high-output efficiency.
13. Trochoidal Milling
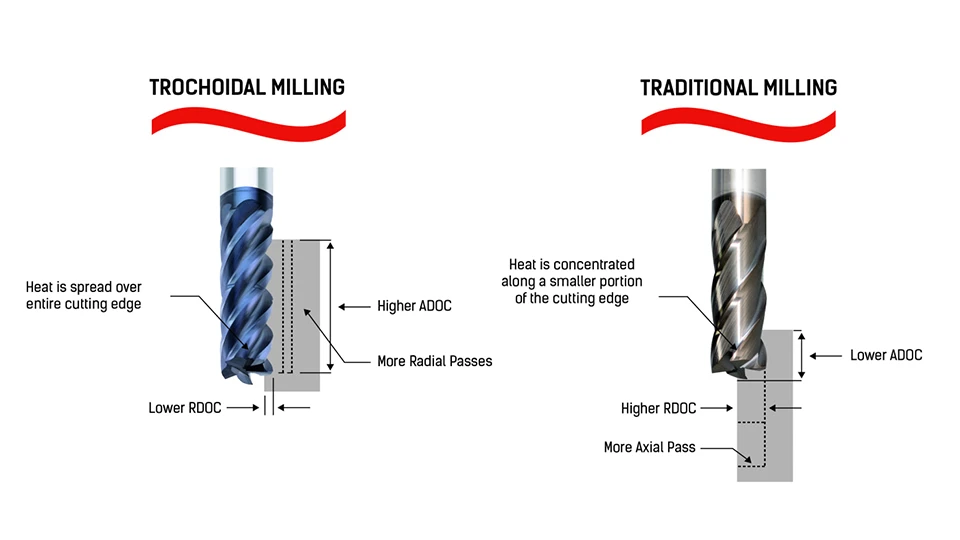
Trochoidal milling is an advanced roughing strategy that utilizes continuous, circular toolpaths to remove material more efficiently while reducing heat buildup and tool stress. Instead of plunging directly into the workpiece or engaging the full cutter width, this method maintains a constant radial engagement, which minimizes cutting forces and enhances tool longevity. It’s especially popular in high-speed machining environments and is well-suited for cutting deep pockets or hard-to-machine materials like titanium and hardened steels.
High-Speed Milling in Hardened Steels
Trochoidal milling excels in operations involving hardened materials, where traditional roughing would cause excessive wear or tool breakage. The reduced engagement and constant chip load allow higher spindle speeds without compromising tool life. This makes it ideal for aerospace and die/mold industries, where materials often exceed 45 HRC and precision is critical even at aggressive speeds.
Spiral Path for Heat Control and Chip Flow
The spiral motion of the trochoidal path ensures continuous movement, promoting better heat dissipation and consistent chip evacuation. Unlike conventional linear passes that may trap chips or cause local overheating, trochoidal paths keep chips moving outward, reducing the chance of recutting and thermal damage. This improves surface finish and supports stable performance, especially in deep cavity roughing.
14. Gang Milling
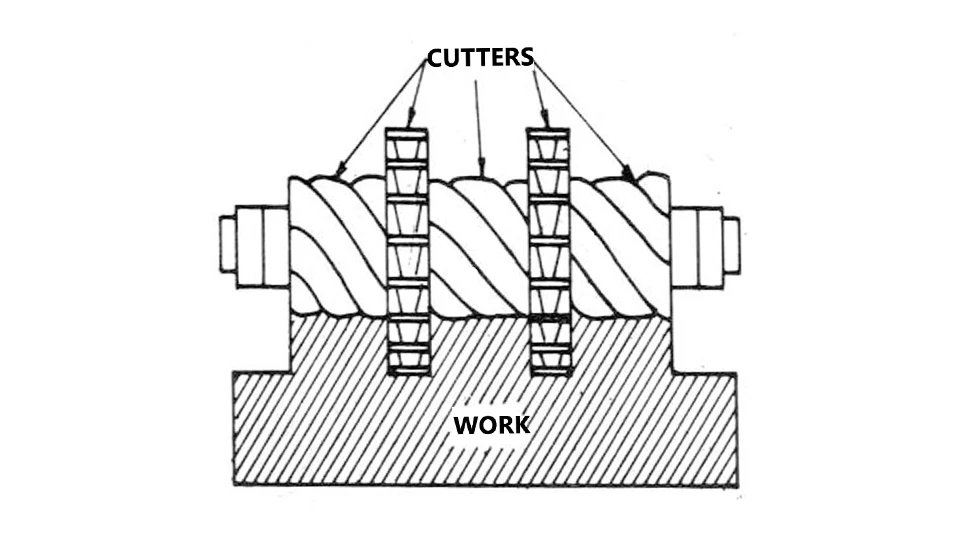
Gang milling is a technique that uses multiple cutters mounted on the same arbor to perform several operations simultaneously. Instead of switching tools or performing sequential passes, this method combines various tools—like side cutters, face mills, and slotting tools—to cut multiple surfaces or features in a single feed. It’s a time-saving approach often adopted in manufacturing setups where part geometry is repeatable and high throughput is essential.
Multi-Cutter Machining in Mass Production
Gang milling shines in mass production environments, especially when machining identical workpieces at scale. For instance, automotive or appliance industries often use this method to mill shoulders, faces, and grooves at once, significantly cutting down cycle time. The ability to synchronize multiple cutters makes it ideal for batch runs of components with consistent geometry.
Machine Setup and Alignment Accuracy
Because several cutters act simultaneously, gang milling demands precise machine setup. Misalignment between tools can lead to uneven surfaces, dimension errors, or even tool crashes. Correct axial positioning, spindle rigidity, and synchronized tool wear management are all critical to ensure dimensional consistency across the milled features. Using pre-set arbors or CNC offsets helps maintain alignment without constant recalibration.
15. Helical Milling
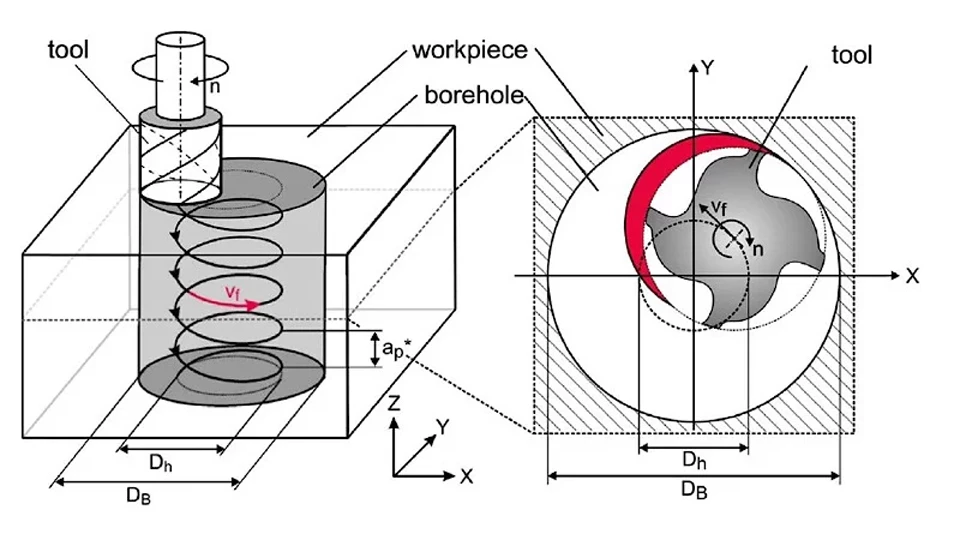
Helical milling is a specialized process in which the tool follows a spiral path to create helical features in a workpiece. Unlike linear milling movements, this technique combines axial and radial feed directions to form continuous spiral shapes. It is commonly used in applications requiring precision helical cuts—like holes with improved surface finish, or components demanding gradual engagement to reduce cutting forces. Because of its smooth entry, it is especially useful in hard-to-machine materials.
Ideal for Thread Cutting and Helical Grooves
Helical milling can be used to cut both external and internal helical features such as grooves, flutes, and even thread-like profiles. While not a direct replacement for tapping, it offers more flexibility and control, especially when threading large-diameter holes or working with difficult materials. The gentle spiral approach minimizes stress and heat, improving tool life and surface integrity.
Toolpaths for Large-Diameter Helical Features
In large parts where traditional drilling or tapping becomes inefficient, helical toolpaths offer better chip evacuation and heat control. By spiraling into the material gradually, the cutting load is distributed, reducing deflection and chatter. CAM software allows operators to precisely define the pitch, depth, and spiral angle, making it suitable for mold bases, automotive hubs, and aerospace components.
Helical vs Thread Milling: What’s the Difference?
Although often confused, helical milling and thread milling serve distinct purposes. Thread milling creates standardized threads using circular tool motion, while helical milling focuses on forming helical contours, not necessarily threaded. The key difference lies in the geometry: thread milling is pitch-specific, whereas helical milling offers more freedom in feature design.
Summary of Milling Operation Types
Across these 15 milling operations, it’s clear that each technique serves a distinct role—from face milling’s high-quality finishing to helical milling’s advanced threading capability. Whether it’s high-speed trochoidal cuts in hardened materials or multi-cutter gang setups in mass production, every operation aligns with specific part geometries, volume requirements, and surface expectations.
Understanding the differences isn’t just academic—it directly impacts machining efficiency, part accuracy, and tool longevity. Mastering when and why to use each method allows manufacturers to build smarter workflows, reduce tool wear, and achieve better ROI. With this foundational knowledge in place, we can now explore how to choose the right milling type based on your unique application needs.
Key Factors to Choose the Right Milling Operation
Not all milling strategies are created equal—and not all jobs need the same solution. Whether you’re working on a prototype, a mass production run, or precision aerospace parts, choosing the correct milling operation makes the difference between success and scrap. Below is a practical checklist to help guide your selection process:
| Factor | Description | Why It Matters |
|---|---|---|
| Part Geometry | Includes size, shape, contours, and complexity | Determines if contour, slot, or profile milling is more efficient |
| Required Accuracy | Tolerance levels and surface finish specs | Impacts whether you choose face milling (for finish) or roughing (for speed) |
| Material Type | Steel, aluminum, titanium, plastics, etc. | Some materials require specific tool paths or cutter types |
| Production Volume | Single-piece, small batch, or high-volume | High-volume may need gang milling, low-volume suits form or thread milling |
| Machine Rigidity | CNC structure and spindle strength | Affects how aggressive you can be with feed rate and depth |
| Tool Life | Expected insert wear and replacement frequency | Influences cost-efficiency and downtime planning |
| Economic Goals | Balancing cost, time, and part quality | Ensures profitability without sacrificing standards |
Use this matrix as your go-to decision guide. For example, when dealing with tight tolerance workpieces made of hardened steel, plunge or trochoidal milling may outperform basic slotting. But if you’re producing thousands of brackets, face or gang milling could double your output per shift.
Tools and Setups Commonly Used in Milling Operations
In milling operations, choosing the right tool and setup is just as important as choosing the machining method itself. Each of the 15 milling techniques we’ve discussed demands specific tool geometries, fixture strategies, and machine settings to perform optimally. Below is a detailed comparison of the tools, fixtures, and machine parameters typically used with each milling method:
Milling Operation – Tooling & Setup Overview
| Milling Type | Recommended Tool Type | Common Fixtures | Spindle Speed & Feed Notes |
|---|---|---|---|
| Face Milling | Face mill with indexable inserts | Machine vice, magnetic chuck | Medium speed, moderate feed |
| Peripheral Milling | End mill, slab mill | Parallel clamps, step blocks | Higher speed, careful depth control |
| Slot Milling | Two-flute end mill, slot cutter | Side clamps, T-slot table | Slower feed, shallow depth passes |
| Plunge Milling | Center-cutting end mill, indexable tools | Rigid setup with column support | Low speed, high feed per tooth |
| Contour Milling | Ball nose end mill | 3-axis or 5-axis table | Variable feed, multi-axis interpolation |
| Profile Milling | Straight flute or corner-radius end mill | Jig plates, 3-jaw chuck | High precision feed, steady RPM |
| End Milling | Flat end mill or ball nose | Vise or modular fixture system | Standard feed, precise pass planning |
| Angular Milling | Double-angle or chamfer cutter | Rotary table or sine plate | Depends on the inclination angle |
| Form Milling | Custom form cutter | Custom-built jigs | Slower passes, tool must match geometry |
| Straddle Milling | Twin side & face cutters on arbor | Dual-head support, work stops | Balanced speed, simultaneous depth control |
| Thread Milling | Thread mill or multi-tooth thread cutter | High-accuracy rotary clamp | Moderate RPM, spiral interpolation |
| Gear Milling | Gear-shaped form mill | Horizontal fixture, rotary indexing | Lower speed, precision toolpath control |
| Trochoidal Milling | Narrow width end mill with CAM path | Strong clamping, vibration dampers | High speed, trochoidal CAM programming |
| Gang Milling | Multiple side & face cutters | Horizontal arbor with stops | Constant speed, parallel cutter alignment |
| Helical Milling | Helical flute end mill | Swivel head or tilt table | Helical interpolation feed, slower RPM |
Understanding the tool-fixture-speed relationship is key to mastering any milling operation. Each setup decision—from cutter type to feed rate—not only influences machining quality but also affects tool life and production cost. By aligning these parameters with the specific needs of each operation, manufacturers can unlock the full potential of their CNC machines.
Tips for Beginners to Improve Milling Quality
For new CNC operators and manufacturing technicians, success in milling doesn’t just rely on understanding the theory—it depends on practical execution. Below are some essential tips that can dramatically improve milling quality from day one.
Optimize Your Toolpaths Before Cutting
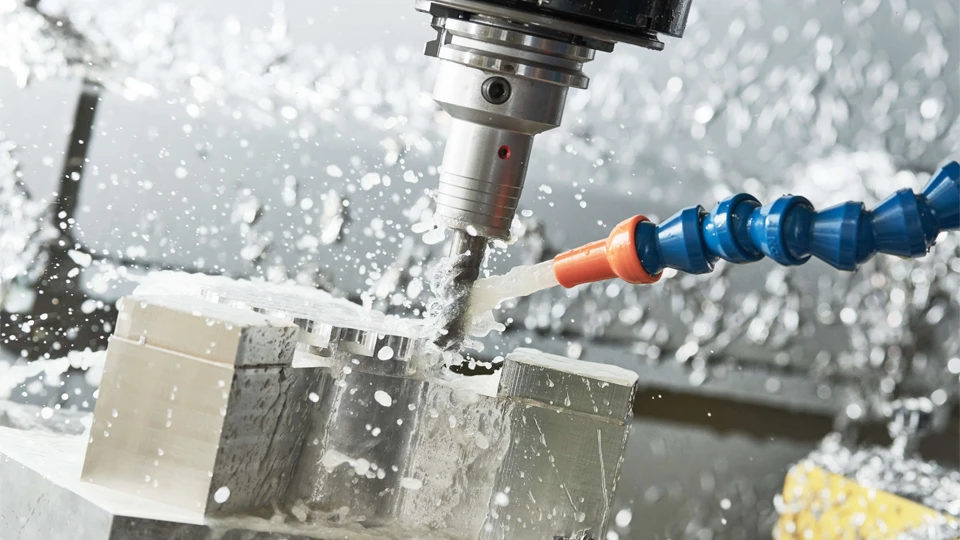
Before touching the workpiece, make sure your CAM software has generated clean, efficient toolpaths. Avoid sharp corners in internal paths, reduce retracts, and limit sudden direction changes. Smooth arcs and climb milling often lead to better finish and lower tool wear. Use simulation tools to preview motion and avoid potential collisions or gouges.
Choose the Right Coolant Strategy
Coolant isn’t just about temperature—it affects chip removal, surface finish, and tool life. For aluminum, mist or flood coolant helps avoid chip welding. For hardened steel or titanium, high-pressure or through-spindle coolant systems maintain temperature stability. Never dry cut unless the tool and material specifically allow it.
Eliminate Chatter with Stability Techniques
Chatter is a common beginner pitfall. Use shorter tool overhangs, more rigid holders, and proper damping techniques. Lower the depth of cut and increase the feed per tooth to improve stability. Always make sure the tool holder and spindle are clean and balanced to avoid vibration during high-speed operations.
Set Parameters with a Conservative Baseline
Rather than jumping to maximum spindle speed or aggressive feed rates, start with manufacturer-recommended values. Pay close attention to chip load per tooth, surface speed, and depth of cut. Adjust gradually based on tool sound, chip color, and finish quality. Keep notes of successful settings for future jobs.
Use Machining Simulation Whenever Possible
Many entry-level mistakes stem from skipping the simulation step. Modern CAM software allows visual testing of every milling step—including tool entry, lead-ins, and tool retractions. This helps catch errors, prevents crashes, and improves confidence. It’s a key habit for reducing scrap and downtime.
Final Thought: Precision Comes from Habits
There’s no shortcut to experience, but following expert setup practices from the start builds habits that ensure better part quality, lower tool breakage, and smoother workflow. Review every cut, listen to the spindle, and use feedback to fine-tune every operation.
Conclusion
Modern CNC milling isn’t just about selecting the right toolpaths—it’s about crafting a strategy. The 15 milling types we’ve explored each serve a unique purpose, from high-speed slotting to precision gear shaping. When applied correctly, they can dramatically boost part accuracy, reduce machining time, and extend tool life. For manufacturers handling diverse materials and varying production volumes, combining multiple milling techniques flexibly often leads to the best outcome—whether in surface finish, efficiency, or overall production cost.
For manufacturers looking to apply these milling techniques with consistency and confidence, machine selection matters just as much as process knowledge. That’s where a capable equipment partner makes the difference. Rosnok offers a comprehensive lineup of CNC milling machines and machining centers—engineered for durability, precision, and adaptability. From plunge milling to trochoidal cutting, their solutions enable factories to meet modern production demands with confidence. With the right machine in place, precision isn’t just a goal—it becomes the new standard. And that’s where competitive advantage begins.
